Tuesday, April 11, 2017

5 Simple Easter Ideas

Easter is right around the corner. I can’t believe it’s already here! Easter is one of my favorite holidays…I think because it signifies fresh beginnings. At least for me it does. 

One of my most favorite things about Easter has always been dying eggs. I dyed them as a kid, teenager, when I moved out with Lisa...all the way up to when we had Sky. Now it’s one of Sky’s favorite things about Easter. As a matter of fact we fight over how many eggs we each get to dye. No matter how many I boil, he ends up dying the most! 

This year I want to try out this method. It’s all over Pinterest but this is where I saw it first. 

KOOL-AID Tie-Dye Easter Eggs – As cool as they are, Tie-Dye Easter Eggs are super easy to make with a few different KOOL-AID packets and hard-cooked eggs—especially with these step-by-step instructions! This kid-friendly craft will make the whole family's holiday a little more colorful. Click here for more tips on how to make coloring Easter eggs extra special.:

I love making crafts with Sky out of egg cartons. We always have empty egg cartons on hand and these bunnies would be just enough to keep him entertained for awhile, but not too fussy that he gets annoyed. He is 10 now, so you know. 

Crafty Morning is where you can find out how to make these little cuties! 
egg-carton-bunny-easter-craft

Decorating for holidays has become something I'm trying to streamline in my life! I'd like to get to where I'm decorating my porch, fireplace and dining room table and that's IT! 

I love this sign from Craft-O-Matic. I think it would be so cute on my fireplace! And actually the color scheme fits my kitchen right now, so I could leave it up all year. It's a win-win :)
Photo Credit: Craft-O-Matic

Of course, I couldn't leave out cookies! I have had these pinned for a looooong time. Maybe, just maybe I'll get them made this year? I'm thinking I will tweak them a bit though and make lemon flavored sugar cookies and ice them with lemon frosting. From a can! Gasp! 
Cheryl's Cookies - sugar cutouts with buttercream frosting. Yum:

But seriously, how cute are they? And I'm thinking they would be sooo easy! Except for that nose. What is that? 

If you aren't up to making them you can order them from Cheryls.com.

This cake right here is going to be THE reason I buy a cast iron skillet. Once and for all. 

Cast Iron Skillet Carrot Cake

I love the idea of this cake because, 1) It looks devine! 2) It's one level (so no trying to layer levels and all that. 3) It's EASY. I'm all about easy these days. Hence why you haven't seen any decorated cookies for awhile.

I hope you have a wonderful and relaxing Easter!

Sunday, November 27, 2016

Easy Peasy Christmas Cookies!

Hey, hey, hey...I'm still alive! 

I know, I totally blow at this blogging thing but I never give up the hope that I will one day be a famous blogger ;) 

Can you believe we are less than a month away from Christmas?! What the what! 

As you may have guessed I love making Christmas cookies but I don't always have time because well...it's Christmas time and there is always sooooo much going on. 

I assume many of you have the same problem so I've put together a few easy cookie ideas for you from around the web! 

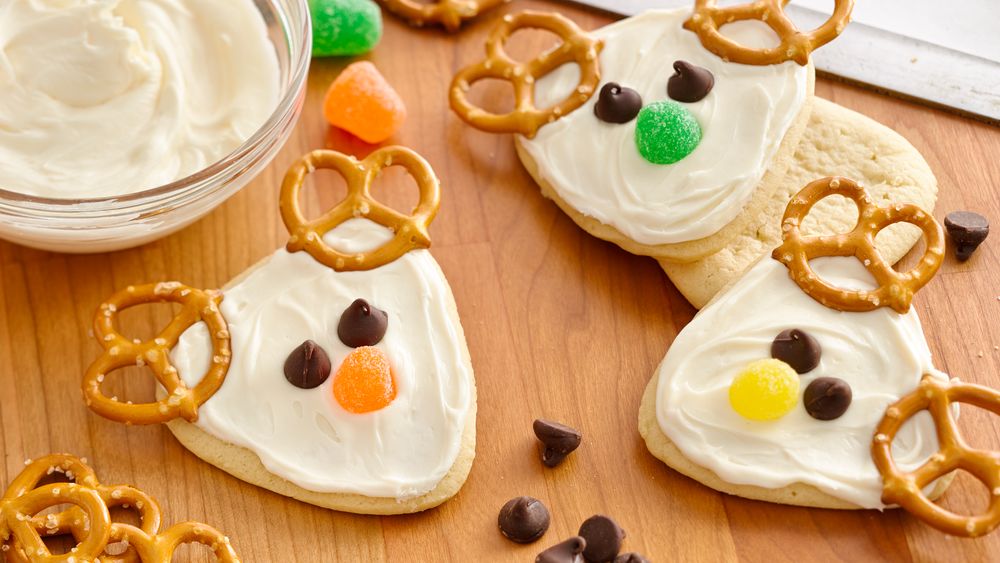
First up are these cute little reindeer cookies that start with a store bought cookie dough! You just can't get any easier. These come to you from Pillsbury and you can find the recipe here. These would be fabulous to take to your child's holiday school party! 

Frosted Reindeer Cookies
Image credit of Pillsbury
You could change things up and use red M&Ms or Red Hots for the nose to make them little Rudolphs :) 

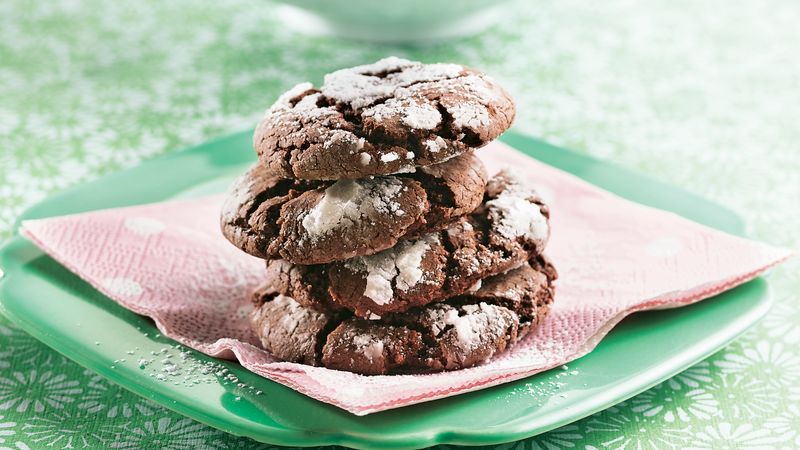
Next, are these by Betty Crocker and I have to say they are one of my favorite cookies...they taste just like a brownie and are so simple to make. I would probably use way more powdered sugar than the recipe calls for but you do whatever floats your boat! 
Cake Mix Fudge Crinkle Cookies
Image credit of Betty Crocker
I know so many people who love red velvet. Red velvet cake, red velvet cookies and anything else they can think of. It's not one of my favorites but I do think they are pretty and I wanted to include them on my list. You can grab the recipe and instructions for these over at Duncan Hines. 
Red Velvet Cookies Recipe
Image credit of Duncan Hines
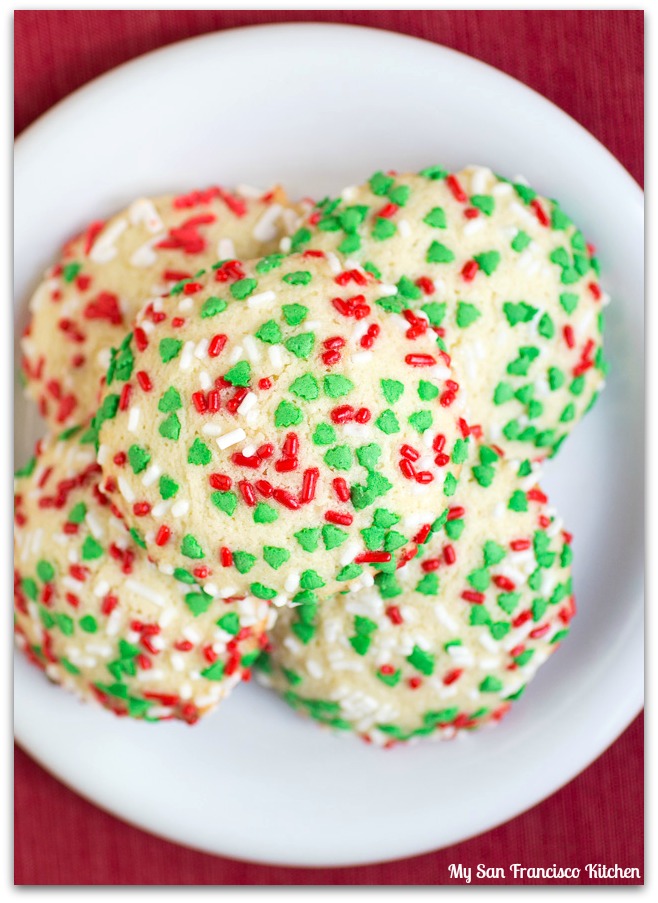
Who doesn't love sprinkles?? I absolutely LOVE sprinkles of any kind, color or shape! And at Christmas time I love all things Red and Green...which brings me to these little cuties. You could go nuts with the sprinkles and possibilities are endless.

sprinkle-cookies-5
Image credit of My San Francisco Kitchen
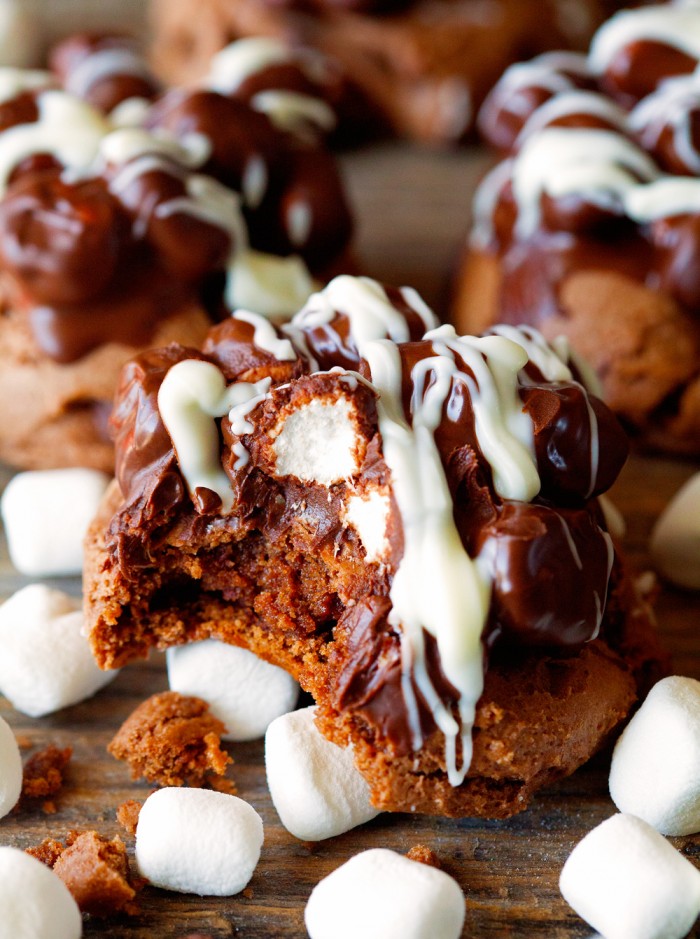
This next one is actually a recipe I'm going to try this year...I stumbled across this recipe from Chef In Training when I googled cake mix cookies. Using a cake mix makes it so quick and easy to whip a batch of cookies and you can always tweak them to make them more "homemade". 
Image result for rocky road cookies with cake mix
Image credit Chef In Training
Candy Canes just scream Christmas to me and while my son loves real candy canes I do not. But I can totally get on board with these! Aren't they just the cutest?! You could make these even easier with the pre-made sugar cookie dough you can find in the store. I would of course love to add a little sanding sugar to these by brushing on a mix of water and almond extract and then sprinkling the sugar over them. Christmas cookies are always better with some bling! :) 

Image credit of TheKitchn 
I think these are some super easy, super cute cookies to take your next Holiday Party! 

Cheers! 


Sunday, January 10, 2016

So Long 2015...Hello 2016!

Hey, Hey, Hey!! Happy New Year! 

I know it's been a looooooong time...AGAIN...but you know life around here during the holidays was craZAY! 

Unfortunately, I don't have a new cookie recipe but wanted to pop in and do a recap of 2015 and talk a little bit about what I want to shoot for in 2016. 

I didn't do a lot of cookies this past year but I did manage to do a few cute ones :)

Some snowflakes...

I did these for my niece's 13th birthday! So cute! 


I did not make any Shamrock cookies in 2015 but we did make this fabulous drink! Isn't it pretty? 


Next up some sweet butterflies...

I must admit, I really didn't think I had done this many cookies last year...but here's a couple more. 


And a few Fourth of July cookies! 


I did cookies for Christmas but never had time to take pictures...but I did get a shot of this FABULOUSLY DELICIOUS cake! Wowza!


Look at that cake!!!! One of my goals this year is to remake this and do a blog post on it. It is soooo good and deserves it's own post! 

Speaking of goals for this year...I have decided that I need to start small...I mean really small...so I'm shooting for one post a month. 

I know that sounds like so few...but it's 4 times what I did in 2015!! 

Let's see if I can make that goal and then I'll bump it up a little bit :) 

Happy 2016!! 

I almost forgot this. This!! (Which by the way, I'm making tonight!) Yummy!

Stay tuned! :)  

Friday, November 27, 2015

Friday Favorites {First Edition}

Happy Friday!! Well, Happy Friday Night!! LOL! :)

I have been wanting to start a weekly post where I highlight my favorite things around the web and haven't had the time to get it going. However, I'm on Thanksgiving break and decided to just go for it!

This edition will most likely not be very polished but here we go!

This drink right here has me wanting to do a Grinch Party like you wouldn't believe! Simplistically Living has put me in the mood! 


grinch punch featured


You can find this recipe here! Hop on over there and check it out!

Next up on my list are these muffins! Wowza! If you have left over pumpkin these are the perfect reason to use it up. Coming to you from Sally's Baking Addiction.

Pumpkin muffins filled with cream cheese filling and topped with sweet cinnamon brown sugar streusel!

Go right now and check these out, you won't be sorry!

And then there's these. I have been on a Little Debbie kick lately and found these perfect gems. I will be making these VERY soon in my own version of course ;)

Cookbook Queen NEVER disappoints!


I love that these start with a cake mix, because really who has time to make EVERYTHING from scratch?? I love that about her recipes. She keeps it real!

Last on the list for this Friday is this festive drink from Gather for Bread. I had to end on a good note and ending with a drink is always good! 


Cranberry Brunch Punch - Only 4 ingredients. So simple. Mix up in minutes!| gatherforbread.com

One can never have enough drink recipes and this one went right to the top of my list. I think this would be great if you were hosting a holiday brunch or cookie party! Of course I will be adding an adult kick to mine ;)

I hope you all had a great Thanksgiving and enjoyed my first edition of Friday Favorites! 

Tuesday, August 25, 2015

Double Chocolate Banana Bread

Hey, Hey!

Boy do I have a great recipe for you today! If you like banana bread you are gonna loooooove this...it has chocolate in it and we all know everything is better with chocolate, right? You know it!


See.......I was right! Do you see all that chocolate? This bread, I use the word bread loosely, not only does it have cocoa powder in it but it also has chocolate chips in the batter and on top! Whaaaaaaat? You heard me right!

As I stated above, I'm not even sure you can classify this as bread, it's really more like a cross between a fudgy cake and a rich brownie.

I sprinkled this batch with powdered sugar but you could easily add strawberries and whipped cream or ice cream on top to make it extra special.

Okay, okay I'll stop chatting and get to the recipe.

Recipe:

1 1/4 C. Sugar
1/2 C. Butter
2 Large Eggs
2 to 2 1/2 C. Mashed Ripe Bananas
1/2 C. Buttermilk
2 Tsp. Vanilla
1/2 C. Cocoa Powder
2 1/2 C. All Purpose Flour
1 Tsp. Baking Soda
2 Tsp. Cinnamon 
1 Tsp. Salt (optional)
1/3 C. Chocolate Chips (I used Ghirardelli) into the batter
2 Tbsp. Chocolate Chips for the top

Place oven rack in the lowest position. Preheat oven to 350 degrees. Spray one large loaf pan (9x5x3) with cooking spray.

On low beat sugar and butter until smooth. Add in eggs mix on low. Next add bananas, buttermilk and vanilla. Beat until smooth. Add cocoa powder, flour, baking soda and salt and mix just until incorporated. Add in chocolate chips and stir until mixed all together.

Pour into prepared loaf pan. Top with chocolate chips.

Bake 1 hour 15 minutes to 1 hour 30 minutes, checking every 5 minutes. Let cool and turn out onto a cooking rack.


So take those bananas sitting on your counter and make this right now!! Go. Now. You will NOT be sorry!

Enjoy!

Friday, June 19, 2015

Fourth of July Love Cookies {How to}

Hey, hey, hey! It's finally here!! I'm going to attempt to give you a "How To" for some cute and simple July 4th cookies.


Although I am a teacher, I'm not so sure of how well I will do at explaining how to make cookies in word form. I'm used to hands on. You know where I would normally take whatever you are doing from you and do it myself. Is anyone else like that?! Please tell me I'm not alone!

First things first, what you need.

  • Heart shaped baked sugar cookies ( Use your favorite recipe)
  • Icing colors in Red, Navy Blue and White (I like to use Americolor) Which you can usually find at Michael's and Hobby Lobby.
  • Blue icing for outlining 
  • Light blue for flooding
  • Red and White icing for detail
  • No. 3 Tips
  • Couplers
  • Disposable bags (that I was and reuse)
  • Squeeze bottles
I like to decorate my cookies on a cookie sheet because it make it easy to turn the cookie without putting your hands on it. 

Begin by outlining the cookie in blue. This is the hardest part to get down when you first begin decorating. You will want the consistency of this icing to be similar to toothpaste.


You will want to outline all the cookies before moving on to the next step. This consistency of icing typically sets up pretty quickly but still do NOT touch! :) 

Next, this is the part of cookie decorating that is so soothing to me. Of course it was only this way once I got it down. The thing with decorating sugar cookies is, you have to practice A LOT. But trust me, you will get it eventually. 

For this cookie I flooded with the lighter blue. I used the left over outline icing, thinned it down and added some white. Flood icing needs to be the consistency of warm syrup. You are probably thinking, "what does that mean". Flood icing needs to be fluid but not runny. When you squeeze it onto the cookie it should spread a little on its own but not run all over. Again, this will take practice and you will have to find your preference. 

Once the flood icing is on the cookie you can use a toothpick to push the icing to the edges. This is something that will take some practice. If you overfill the icing runs all over, if you under fill the cookie you are fighting with the icing to get it the edge. You will get where you know how much you need to make the process easy and quick for you. Remember, practice makes perfect! ;)

Now for the fun part. This technique is called wet on wet. I LOVE, LOVE, LOVE polka dots! So what you do is once the cookie is flooded completely you use the red and white to drop dots onto the cookie. It's like magic! This technique saves you a day in the cookie world. You can go this far, let them dry for 24 hours and voila, they are ready! 


I just dropped a few red dots and then used the white. Play around and have some fun with sizing of the dots and placement. It's A COOKIE so don't stress! Someone is gonna shove in their mouth and devour it in 10 seconds, so don't get too hung up on the details and all attached to it! Trust me, I've had to let go of idea that everyone cares as much as I do as how cute the cookie is. Humph!

Ultimately they don't care...they just want to eat it! 

And now we wait...24 hours if you can. My niece can NOT...she eats them semi-set up but not me...I like them really set up. Whateva you wanna do, it's your cookie :) 

Okay, with these cookies I did add some detail the next day because...well, I have issues. I couldn't just let it be. 

I added some dark blue outline to finish it off. You do NOT have to do this. Trust me your peeps are gonna think you are IT if you get this far and the cookie tastes good. 


I also did some cute little stars to go with. 

You may notice that it looks like the red is "bleeding" and it does. There are ways to stop this if you want to research it, but here's the deal, I can't stress about that. IT'S A COOKIE! I'm not making art here. 

Just cute, simple cookies! 

Enjoy! 

Tuesday, June 16, 2015

I'm baaaaaaaaaaaaaack! Again, I know ;)

Hey, Hey! How do you ya like the new look around here? I finally decided to give the blog a make over with a more professional look. I LOVE how it turned out! I want to give a great big shout out to Sweet Baby Designs, she ROCKS! 

I know, it's been foreeeeeeeeeever since I last posted, but I was trying to decide if this is something I really wanted to do. I am a mother, a partner and a teacher and this blogging business is some serious work! 

Another thing I was pondering was, if I decided to continue blogging, in what capacity did I want to do it. Do I just want to do cookies and if so what do I want to do with the cookies...strictly how to decorate, recipes, just cookies or other baked goods, regular food, ect.?? So many questions. 

For now this is what I'm planning...

I want to show you how to decorate very simple cookies. Cookies that are made with a cookie cutter you can pick up just about anywhere, using three colors or less and with only a few details. Nothing too complicated because let me tell you what, this decorated cookie business is NO JOKE! There are some cookies out there that look like true works of art and they are! Kuddos to those fabulous cookie artists but that is not this woman!

I also want to continue with "Tuesday's Tips and Tricks". This will be a place where I share some of the things that work for me when it comes to making cookies and I might throw some other stuff in there as well from time to time. 

You'll notice I have a tab titled, "Beyond Cookies". This is where I may share some home projects, teacher stuff or just random things going on in my life. 

I really believe this blog will move towards more a lifestyle blog but I wasn't quite ready to make the jump but i wanted to started and I am!

Please follow along as I see where this little blog takes me! Let's enjoy the ride!! :)


Tuesday, September 23, 2014

How to Roll Dough Evenly-Tips and Tricks Tuesdays {First Edition}

Hi!

Welcome to the first edition of "Tips and Tricks Tuesdays". I will be sharing tips and tricks I know that may help you with all of your cookie adventures! I am by no means an expert, but I do know a few things about how to create cute sugar cookies that you can absolutely do with a little practice! :)

So,

Have you ever wondered how those "cookie people" get their cookies to be all the same thickness? Well, I am one of those people and let me tell you, it took a lot of trial and error to find a method that worked for me.

There are many methods out there and a lot of gadgets you can buy, but I'm here to tell you don't have to them. You can just go down to your local hardware store and buy one dowel rod and cut it in half and voila!

See...


The ones I use are 1/4 inch thick and they are square, not round...that wouldn't work! ;)

I like to roll my dough right on the counter top with a lot of flour. Don't be afraid of the flour, it will not, I repeat will not hurt your cookies.

P.S. Don't you think that looks like a skull face? I just noticed that.

I roll about a third of my dough at a time, about a baseball size ball shaped into a disc. Set it between the two rods, nice and tight and start rolling. Make sure your rods are always touching the sides of your dough to ensure even rolling.


This takes practice but over time you will get the hang of it.

Another side note, I like my dough to be slightly chilled, but this is not the same for everyone. You just have to test a few methods until you find what's right for you.

Why don't you drop a line in the comment section and let me know what you think about Tips and Tricks Tuesdays! And let me know what you may need help with...

I'd love to hear from you :)

~Ashli

Friday, June 20, 2014

The Best Breakfast Muffins...

Okay, I've been making these breakfast muffins for a long time but never thought about putting them on the blog. I actually bake a lot of other things BESIDES cookies, I just never think of sharing them. However, that's about to change, beginning with these muffins! :)

Don't those look fabulous?? They are light, moist and slightly spicy! Everything you need in a breakfast muffin, in my opinion. I'm not much of a sweet eater in the A.M., I usually save those indulgences for the night time ;)

Recipe:
3 cups flour(I used all purpose, but you could certainly use whole wheat)
1 Tbsp. baking powder
1/2 tsp. baking soda
1/2 tsp. ground black pepper
1/4 tsp. salt
1/2 tsp. cayenne pepper
1/2 tsp. garlic powder
1/2 tsp. parsley flakes
2 whole eggs
1 1/3-1 1/2 buttermilk
3 tbsp. Olive Oil
2 tbsp. butter (melted)
1/2 cup chopped green onion (mostly the tops)
1 pkg. Canadian bacon, chopped (about 3/4 cup)
1/4 cup grated cheddar cheese
1/4 cup grated pepper jack cheese
1 cup chopped bell peppers (any variety, I used red, yellow and orange)

Directions:
Preheat oven to 400*. Spray muffin tin (12) with non-stick spray.

In a large bowl ( I used my That's a Bowl) whisk together all the dry ingredients. In a separate bowl beat eggs, buttermilk and olive oil. Once the butter has cooled a little bit add to the buttermilk mixture. Add the Canadian bacon, onions, peppers, and cheese to the dry mixture and stir together. Add buttermilk mixture and stir together just until it comes together. Don't over mix. It will be sticky, that's okay. If it seems too dry add the additional 1/4 cup of buttermilk a little at a time.

I use two serving spoons to scoop the batter into the muffin tins. They should be pretty full, as this makes 12 large muffins! :)

Bake 20 minutes or until toothpick comes out clean.

Let cool before removing from pan.

These store very well in the freezer and you can heat them in the microwave from the frozen state by wrapping in a damp paper towel and heating for about 1-2 minutes on high.


These make THE perfect on the go breakfast! And if you are a calorie counter these come in at around 275 calories :)
 
Try them and let me know what you think!

Recipe adapted from Eating Well.


Tuesday, February 4, 2014

Snow Days...


Isn't that pretty?? Yeah, I think so too, I really do. But. You saw that coming didn't you? Sometimes, I get soooo sick of it! Especially, when you are stuck in the house and can't get out of your freakin' driveway! Ugh:(

I truly do love snow days...especially the part where I get to spend time with my family. I also love that I don't HAVE to do anything, because it's like a free day. A day where you can just hang out, maybe bake or clean or just watch some TV.

But then it's enough already and I want to go outside. I want to go shopping, go out to eat, to the store...something. Does anyone else feel this way? Stuck. In the house for days with the children and nothing to do.

I know those perfect mother's who craft with the children, bake with the children, redo a room with the children. I am not that mother. My kid is not that kid. He's not into the craft thing. He's only into the baking thing for about two minutes, and who has time to do redo a room!

I just want to go outside!

Now, I sound like the children.

Did I mention I'm a teacher? And we haven't had outside recess for daaaaaaaaaaaays?

 
He got to go outside...for two seconds!

In my defense I did bake after all. I made cupcakes, then I graded papers, cleaned the bathrooms, and watched The Croods with my kiddo! :)

And tomorrow we are going to sled down the driveway, make snow ice cream, and enjoy another free day together!

Oh, and shovel the car out of the driveway...maybe.

Um, there's no suggestion list of things to do. We're you looking for one? Sorry.

If you have one, will you send it to me? No crafts. No baking. No DYI projects. Never mind.

So, tell me...what do you do on snow days?

Oh, okay...here's a list of things to do. It's from The Happy Housewife. She rocks! Maybe I'll pick one of her things to do tomorrow! :)

Check her out!

http://thehappyhousewife.com/homeschool/101-things-to-do-on-a-snowy-day-with-kids/

Saturday, February 1, 2014

I'm Baaaackkkkkkkkkk! :)

OMG! It's been almost a year and a half since my last post. Wowza! I've made many a cookie since then, but just kind of let the blog thing go. But I missed it and decided to give it another whirl!

Lots has happened since my last post. For starters, I graduated from college and started my first teaching job! Yay! I'm a third grade teacher to 22 of the greatest kids ever! I've also started my master's program...I know I'm crazy, I guess I don't think I'm busy enough! My "baby" is in 1st grade! Can you believe it?! Me either!

Honestly, I'm not sure how often I'll be able to keep up with the blog, but I'm going to give it a good effort! It was one of my New Year's Resolutions. That and less time on the computer...not sure how those two are going to work out together ;)

I hope to share some tips with you on cookie making...the easy way. My cookies have become much more simple and frankly that's the way I like them! I'm a busy woman and I just don't have time to make fancy ol' cookies all the time. But I will tell you this, they are tasty and they still impress!

These were some of my favorites from 2013...I'm especially loving those tropical ones right now...kind of sick of all this snow! :(

I will be sharing more details on how I actually do my cookies and not just pics of the finished product. I hope to inspire you to make your own sugar cookies! Your family and friends will be so impressed! I'm still amazed at the reactions I get from my sugar cookies...especially because there is sooo much amazing talent out there!

It feels good to be back...hoping you will join me when you can :)


Tuesday, August 28, 2012

Strawberry Cake Cookies-Easy Recipe

I know, I know, it's been a looooooong time. But I have good excuses. My son started Kindergarten(sniff, sniff) and I started my last year of undergraduate school, so it's been a little hectic around here!
But I did make these cookies for my niece to take to school for her birthday, she turned 5 and also started kindergarten.

Of course she loves pink!
I used a cake mix...I know, again...I can't help it, they are so easy and soooo good! I covered these in sprinkles and when they were finished this is what they looked like, perfect!


Recipe:

1 Strawberry Cake Mix
2 Eggs
1 Stick Butter
1 tsp. Vanilla
2 Tbsp. Flour

Mix all the ingredients together until well combined. Roll into one inch balls ( I used a small cookie scoop). Roll in your choice of sprinkles. Bake at 350 for 10-12 minutes on a baking sheet that has been lined with parchment paper.

Eat! :)

Thursday, August 9, 2012

My Quest for the Perfect Sugar Cookie...

Okay, here's the deal, the sugar cookie I usually use has a wonderful taste, but...it doesn't hold it's shape. AND IT DRIVES ME CRAAAAAAAZY! If I use mini or very small cookie cutters they seem to do better, but if I use anything over 2-3 inches, sometimes you can't even tell what the freakin' cookie is supposed to be!
Ugh!!!!
 So, I have set out to find the perfect sugar cookie recipe that, both holds it shape and taste great.

Ding, Ding, Ding! I found the one that holds it's shape! Yay!


See. All the same thickness, and you can actually see the points on my Christmas tree cookie. Christmas tree you may ask yourself? In August? You'll see soon enough:)
Anyway, back to this sugar cookie recipe. I'm not quite sure if I like it well enough to keep it yet, because the flavor just isn't quite right for me. BUT, it's not iced yet. So I won't judge a naked cookie:)

I adapted the recipe from Karen's Cookies only slightly this time. While my recipe uses powdered sugar, baking soda, and cream of tartar(no wonder they spread), this one uses none of that or baking powder and it uses regular sugar.

 I'm going to keep at it until I prevail! Like I'm a super hero or something. I know...I'm a geek!

If you want to give the recipe a whirl, here it is...

Sugar Cookies Take One
1 C. Butter
1 C. Sugar
1 Egg
1 Egg Yolk
3 Tsp. Vanilla
1 Tsp. Almond Extract
2 1/2 C. Flour

In the bowl of an electric mixer, mix on medium speed the butter and sugar until fluffy. About 3 minutes.
Add the egg and egg yolk one at a time. Add Vanilla and Almond Extract. Mix on medium until mixed well.
Turn off mixer, scrape down sides, add flour. Mix on medium just until mixed. Do not over mix.
Divide into 2 sections, wrap in plastic wrap, refrigerate for at least 30 minutes, but up to 2 days.

When ready to bake. Heat oven to 375 degree. Line baking sheets with parchment paper.
Remove one disc of dough and let sit on counter for 5 minutes.
Roll out onto a floured surface to about a 1/4 inch thickness.
Cut with desired cookie cutter.
Bake 10-12 minutes.

Note: While I had one pan in the oven, I went ahead and cut another batch, placed that pan in the freezer and then baked when the first pan was finished. This is why it may take 10-12 minutes to bake. Or maybe even 13 if you like a crunchier cookie.

That's it! I will keep you posted on my quest and let you know when I find the "perfect" cookie for me!:)

Now, can you guess what I'm going to do with those Christmas Trees?


Monday, August 6, 2012

Chocolate Cupcakes with Chocolate Frosting!

Okay, not gonna lie...taking pictures of food is not that easy! You would think it wouldn't be that difficult. I mean it doesn't move around or talk back, but it is VERY hard. So, I am aware that my pictures need a lot of work, but this is the best that I can do for now.


Regardless of the pictures, these cupcakes are yummy! This recipe is by far the best homemade chocolate cake recipe I have found, so far. It reminds me of a cake my mom makes that is called "Black Wacky Cake". It is so moist it needs no frosting and it is great cold! Now I'm not saying the frosting isn't good, I'm just saying if you can't wait to make the frosting...eat the cake naked:)

I had the privilege of making these for a great girl who is turning 18. She is on her way to Kansas State University where she will be majoring in marketing. She said that I should open a bakery...maybe when she's finished with school she can help me with that! :) Ha ha. Until then, I'll have to pretend this blog is my bakery...in downtown Seattle...ahh...nice dream huh?
Maybe if I really think I will be opening a bakery, I shouldn't share the recipes? I mean I don't want to give out all the goods, do I? Okay, I guess so:)

Chocolate Cupcakes

2 C. Sugar
1 3/4 C. Flour
3/4 C. Cocoa Powder
1 1/2 tsp. Baking Powder
1 1/2 tsp. Baking Soda
2 Eggs
1 C. Whole Milk
1/2 C. Canola Oil
3 tsp. Vanilla
1 C. Boiling Water

Directions:

Line muffin tin with liners. Heat oven to 350 degrees.

In a large bowl, stir or whisk together the sugar, flour, cocoa, baking powder, and baking soda.

Add eggs, milk, oil, and vanilla. Beat on medium speed for about one minute.

Stir or mix in boiling water, VERY slowly. The batter will be very thin, this is correct. Don't panic.

Fill liners about 2/3 full. You can put in a large glass measuring cup and pour into liners.

Bake for 17-22 minutes. I know this is a big difference but the original recipe calls to bake for 22-24 minutes, but I only have to bake for 17 and they are perfect.

Cupcake recipe adapted from Hershey.

Frosting

1 Stick of Butter
1 8 oz. Block of Cream Cheese
2 tsp. Vanilla
1/2 C. Cocoa Powder
4 C. Powdered Sugar
1-3 Tbsp. Heavy Whipping Cream

Blend butter and cream cheese until smooth, add vanilla, mix until incorporated. Blend in cocoa powder until mixed well. Next add powdered sugar, one cup at a time, then add in cream a little at a time until you reach the consistency you like.

Recipe adapted from Glorious Treats.

How about a close up? :)


Linked up with Skip to My Lou! Love her!!


Blogging tips